Introduction
In this article, we will cover the process of how to Install WordPress using Softaculous.
Softaculous is a powerful tool integrated within the cPanel interface, offering a streamlined and efficient way to install various applications, including WordPress. This feature simplifies the installation process, eliminating the need for manual WordPress setup. By using Softaculous, users can quickly deploy WordPress on their hosting account. The primary benefits of using Softaculous for WordPress installation include time-saving, reduced technical complexity, and reliability.
Quick Start Guide
Accessing Softaculous to install WordPress
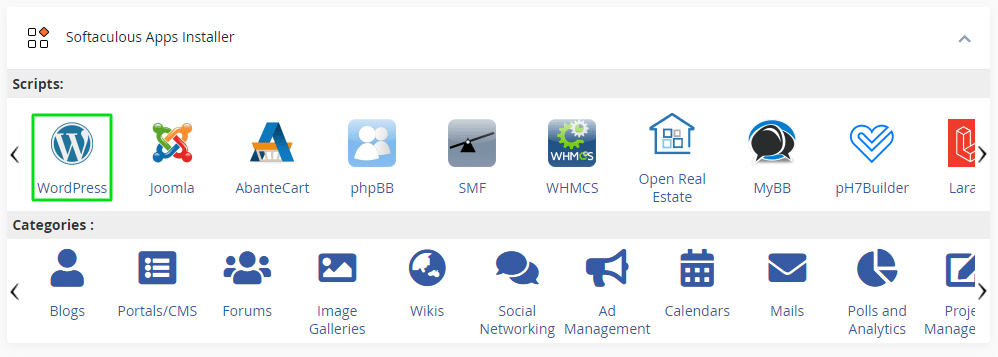
To start, log in to your cPanel account and locate the ‘Softaculous Apps Installer’ section. Click on the Softaculous icon to open the application installer interface.
- Within Softaculous, find WordPress in the list of scripts and click on the WordPress logo.
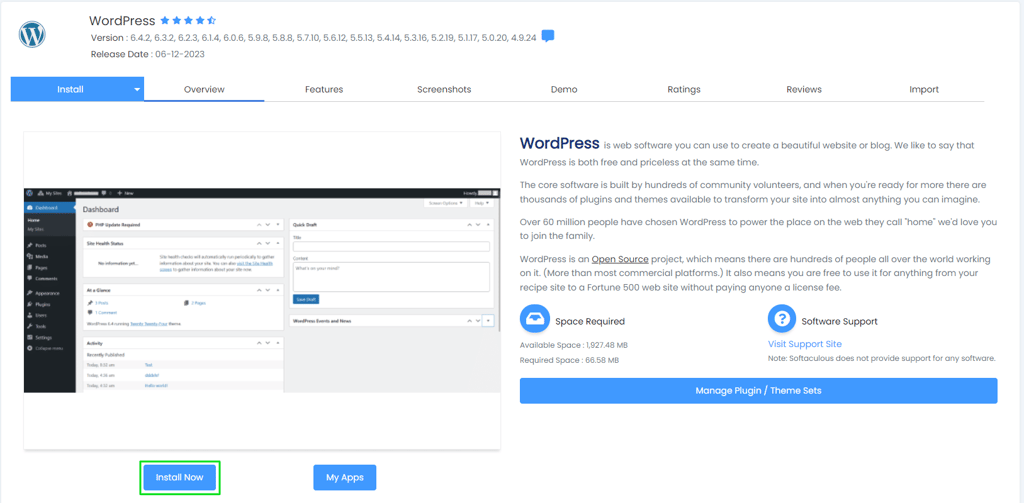
- Click the ‘Install Now’ button to initiate the installation process.
- Configure the basic settings by providing essential details like the choice of HTTP or HTTPS protocol, domain selection, and directory path

- Configure your website’s name and description. Create an admin account by choosing a username, password, and email address for WordPress dashboard access.
- Choosing a Theme (Optional) – Softaculous allows you to select a WordPress theme during installation. Browse and choose a theme, or skip this step to select a theme later from the WordPress dashboard.
- Finalise the installation by reviewing your settings. Click ‘Install’ to start the WordPress installation. Softaculous will automatically complete the installation and confirm the setup with links to your new WordPress site and its dashboard.
In-depth Guide
Understanding each step in depth is essential for both setting up your site correctly and ensuring its long-term success. The guide in-depth section covers each of the installation options in more detail. Each of these elements plays a vital role in the overall functionality and security of your WordPress website. By understanding these options in detail, you will gain a thorough understanding of how to tailor the WordPress installation to meet your specific needs and preferences, ensuring a robust and efficient website setup.
Overview of the options when installing WordPress
Understanding Protocol and Domain Selection
When installing WordPress, Softaculous prompts you to select a protocol – HTTP or HTTPS. At SmartHost, we provide a free SSL certificate with every hosting package, reinforcing our recommendation to always use HTTPS. This option ensures website traffic is encrypted and secure, enhancing both user trust and your site’s SEO performance. After SSL is enabled on your domain (which may take 24 hours after initial setup), select HTTPS in Softaculous to make the most of this security feature.
Directory Path Considerations
By default, WordPress installs in the root directory of your domain. If you prefer to install it in a subfolder, specify the folder name in the ‘In Directory’ field. Leave this blank for root directory installation.
Site Settings Explanation
The ‘Site Name’ and ‘Site Description’ fields are crucial for SEO and user recognition. Enter a descriptive, concise name and a brief description of your website’s purpose.
Securing Admin Account
Creating a strong admin username and password is vital for website security. Avoid common names like ‘admin’ and use a unique, complex password. The admin email address is essential for managing your WordPress site and recovering your account if needed.
Advanced Options
Softaculous offers advanced options like database name customisation and automated backups. For non-technical users, the default settings are typically sufficient. However, setting up automated backups is recommended for data safety.
Theme Selection Process
While optional, selecting a theme during installation can give you a head start on designing your website. Softaculous provides a range of themes, but you can always choose or change your theme later within the WordPress dashboard.
Completion and Post-Installation
Once you click ‘Install,’ Softaculous automates the rest of the process. After installation, you receive URLs to your website and WordPress dashboard. It’s important to log in to the dashboard and start customising your site, including setting up essential plugins and further configuring settings.
Additional Functions
With Softaculous, you have the capability to not only install WordPress but also to comprehensively manage the entire lifecycle of your WordPress installation. This includes tasks such as upgrading, creating backups, restoring, cloning, staging, and much more, providing a full spectrum of management tools for your WordPress site. Explore these options in our other knowledgebase articles.
Summary
Utilising Softaculous within your SmartHost cPanel account for WordPress installation and management streamlines and simplifies the process significantly. Whether you are a beginner or an experienced webmaster, Softaculous offers an intuitive interface that makes managing the lifecycle of your WordPress site – from installation to upgrades and beyond – both efficient and straightforward. With SmartHost’s commitment to providing free SSL certificates, we strongly advise using HTTPS to ensure enhanced security and better SEO rankings.
Frequently Asked Questions
What is Softaculous and how does it relate to WordPress?
Softaculous is an application installer included with all SmartHost cPanel shared hosting accounts that simplify the process of installing web applications, including WordPress. It allows users to easily install, update, and manage WordPress websites.
Do I need technical skills to install WordPress using Softaculous?
No, technical skills are not required. Softaculous is designed for ease of use, making the installation of WordPress straightforward for users of all skill levels.
Can I select a specific domain for my WordPress site in Softaculous?
Yes, you can select any domain associated with your cPanel account during the installation process in Softaculous.
What does it mean to install WordPress in the root directory?
Installing WordPress in the root directory means it will be accessible directly through your main domain (e.g., ‘yourdomain.com’). This is achieved by leaving the directory field blank in Softaculous.
How does SmartHost’s free SSL certificate benefit my WordPress site?
SmartHost provides a free SSL certificate with every hosting package, enabling HTTPS for your site. This enhances security, builds user trust, and can improve your site’s SEO ranking.
Can I back up my WordPress site through Softaculous?
Yes, Softaculous includes options for backing up and restoring your WordPress site, ensuring your data is safe and can be recovered in case of any issues.
Is it possible to clone or create a staging site for WordPress using Softaculous?
Absolutely, Softaculous offers features to clone your WordPress site or create a staging environment, allowing you to test changes before applying them to your live site.
