- Home
- Knowledge Base
- cPanel
- Security
- Understanding and Managing SSL/TLS on cPanel
Understanding and Managing SSL/TLS on cPanel
This article assumes you are already logged in to cPanel. Click Here for details on how to log in to cPanel, follow this guide.
Quick Start Guide to SSL/TLS on cPanel
Introduction to SSL/TLS Management
Secure Sockets Layer (SSL) and Transport Layer Security (TLS) are fundamental for safeguarding internet connections against potential threats. These protocols encrypt data transfers between users’ browsers and your website, ensuring confidentiality and integrity of information. cPanel simplifies the process of managing SSL/TLS, making it accessible even for individuals without a technical background. This quick start guide provides straightforward steps to manage SSL/TLS settings on your cPanel account.
Steps to Manage SSL/TLS in cPanel
- Log in to Your cPanel Account: Access your cPanel dashboard by entering your credentials on the login page.
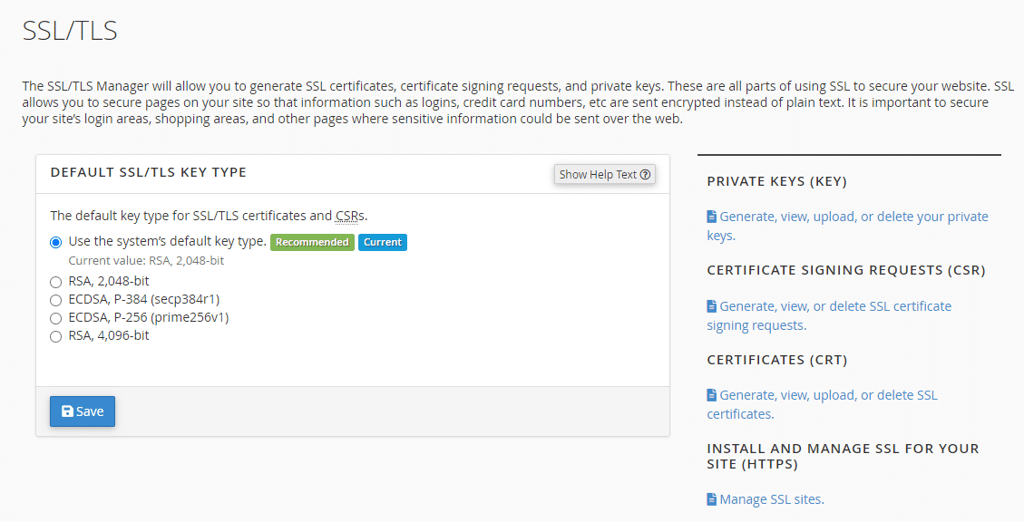
- Navigate to the Security Section: Look for the “Security” section on the cPanel dashboard. Here, you will find the “SSL/TLS” icon.

- Select the Desired SSL/TLS Option: Click on the “SSL/TLS” icon to explore various options, including installing and managing SSL certificates, generating CSR (Certificate Signing Requests), and managing private keys and certificate chains.

- Install an SSL Certificate: If you need to install a new SSL certificate, click on “Install and Manage SSL for your site (HTTPS)”. Follow the on-screen instructions to complete the installation.
- Generate a CSR: For purchasing a new SSL certificate from a third-party provider, generate a CSR by selecting “Generate, view, or delete SSL certificate signing requests.”
- Review and Manage Installed Certificates: View and manage your existing SSL certificates under “Manage SSL sites”. Here, you can update or remove certificates as needed.
Further Reading on the SSL/TLS Features in cPanel
Understanding SSL/TLS Protocols
SSL and TLS protocols serve as the backbone of secure internet communication, establishing an encrypted link between a web server and a browser. This encryption ensures that all data passed between the web server and browsers remain private and integral, critical for protecting sensitive information like credit card numbers and personal details against interceptors and hackers.
Installing SSL Certificates
Installing an SSL certificate via cPanel is a straightforward process. Certificates can be auto-installed through cPanel’s AutoSSL feature, which automatically generates and renews Let’s Encrypt certificates for your domains. Alternatively, you may need to manually install certificates purchased from third-party providers. This involves uploading the certificate details into the cPanel and correctly assigning it to the domain or subdomain in question.
Generating CSR for SSL Certificate
Before obtaining an SSL certificate from a Certificate Authority (CA), you must generate a Certificate Signing Request (CSR) through your cPanel. This request provides the CA with your public key and other necessary details, such as your organisation’s name and domain for which the certificate is issued. It’s crucial to ensure the accuracy of this information, as it appears on the SSL certificate.
Managing Private Keys
Each SSL certificate comes with a corresponding private key, essential for decrypting information encrypted by the certificate. cPanel allows for the generation, view, and deletion of these private keys. Proper management and safeguarding of private keys are imperative to maintain the security of your SSL-secured communications.
Certificate Chains and Their Management
Some SSL certificates require the installation of a certificate chain or intermediate certificates to be recognised by web browsers. These intermediate certificates link your SSL certificate to a globally trusted CA, proving the trustworthiness of your certificate. cPanel facilitates the easy upload and management of these certificate chains, ensuring your site’s SSL certificate is trusted across all browsers.
Summary
cPanel’s SSL/TLS management tools offer a comprehensive suite for securing your website. By following the steps outlined in the Quick Start Guide and understanding the detailed features provided in the in-depth guide, even non-technical professionals can ensure their website communications are secure. Regularly updating and managing SSL/TLS settings is crucial for maintaining the privacy, integrity, and security of user data.
FAQ About SSL/TLS Certificates
An SSL (Secure Sockets Layer) or TLS (Transport Layer Security) certificate is a digital certificate that authenticates the identity of a website and enables an encrypted connection. This is crucial for protecting sensitive data exchange between a user’s browser and the web server.
An SSL/TLS certificate is necessary to:
– Secure online transactions and protect user data from being intercepted.
– Boost customer trust by displaying security indicators like the padlock icon in the browser address bar.
-Improve search engine ranking, as search engines favour HTTPS-enabled websites.
– SmartHost, as part of your shared hosting package. SmartHost provides and renews Let’s Encrypt certificates for your domains.
– Direct purchase from a third party Certificate Authority (CA) like Let’s Encrypt, Comodo, Symantec, etc.
Yes, you can obtain and install a free SSL/TLS certificate from SmartHost. We will automatically install and renew SSL certificates for your domains.
To verify your SSL/TLS certificate installation, you can:
– Visit your website using “https://” and look for the padlock icon next to your domain in the browser.
– Use online tools like SSL Labs’ SSL Test, which checks the server’s configuration and the certificate’s validity.
If your SSL/TLS certificate expires, browsers will display a warning message to users attempting to access your site, indicating that the connection is not secure. This can significantly impact user trust and website credibility.
Yes, it’s recommended to renew your SSL/TLS certificate before its expiration date to ensure uninterrupted encryption and security. Most CAs send reminders as the expiration date approaches, and cPanel’s SmartHost’s Free SSL certificates are automatically renewed prior to expiry.
Related Articles
- Imunify360: Protect Your Website with SmartHost
- How to Enable Hotlink Protection in cPanel on Smarthost
- Managing API Tokens in cPanel at SmartHost
- Understanding cPanel – How to Install an SSL/TLS Certificate
- Understanding cPanel SSH Access – Managing Keys
- How to Use the IP Blocker in cPanel: A Comprehensive Guide


