How to Export MySQL Data Using phpMyAdmin
Learn how to expertly export MySQL data, an essential skill for database management and backup strategies. PHPMyAdmin is a powerful tool within cPanel that simplifies the management of MySQL databases. It allows users to interact with their databases using a web-based interface. One of its key features is the ability to export data from MySQL databases. This functionality is crucial for creating backups, transferring data to a new website, or for analytical purposes.
This article guides you through the process of exporting data from a MySQL database using phpMyAdmin within cPanel, an essential skill for database development and maintenance.
Quick Start Guide
Overview
Exporting MySQL data via PHPMyAdmin in cPanel is a straightforward process. This guide will lead you through the necessary steps to successfully export your data.
1: Access PHPMyAdmin
- Log in to your SmartHost cPanel account
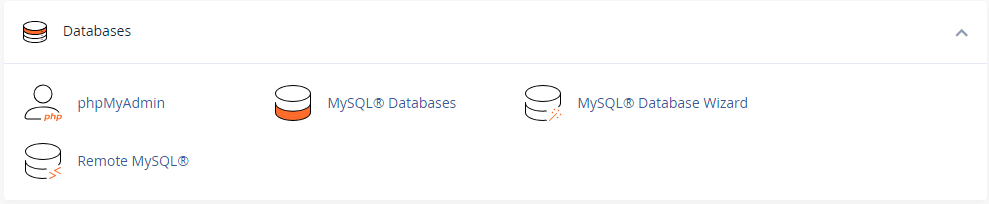
- Navigate to the ‘Databases’ section in your cPanel dashboard.
- Click on the ‘PHPMyAdmin’ icon to open the PHPMyAdmin interface.
2: Select Database
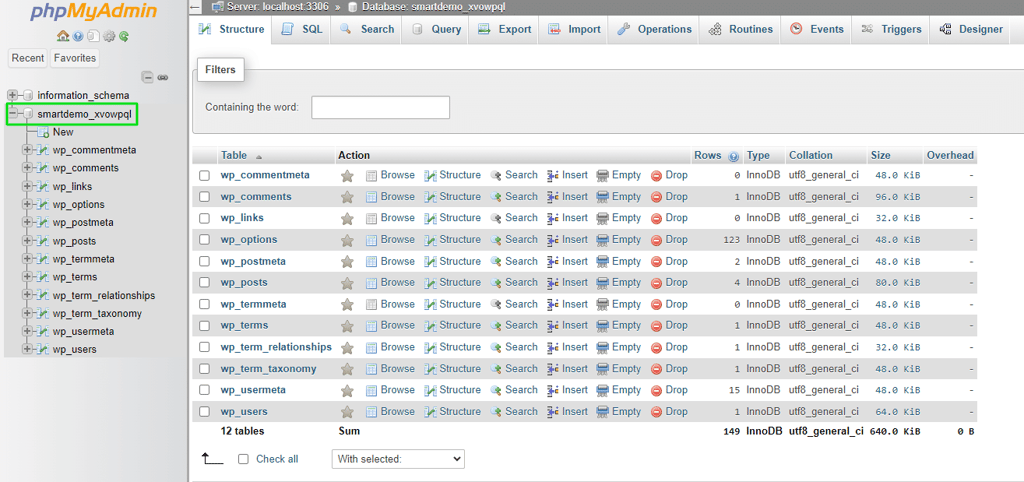
- In PHPMyAdmin, locate the database you wish to export from the left sidebar.
- Click on the database name to see its structure.
3: Export MySQL Data from your Database
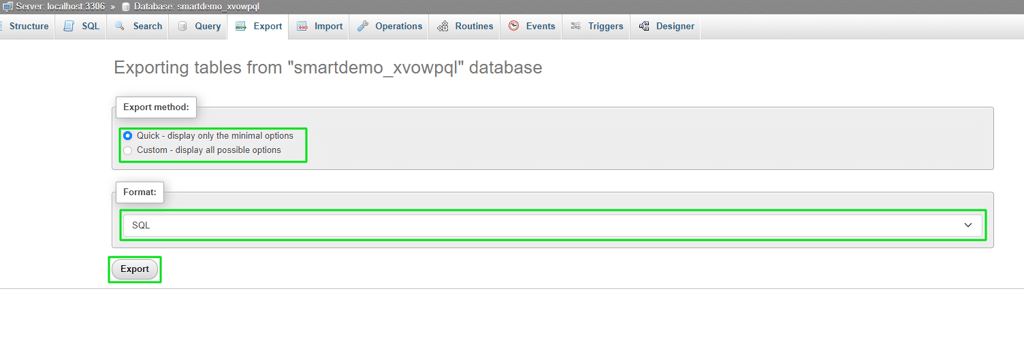
- After selecting the database, click on the ‘Export’ tab at the top of the page.
- Choose the export method and format (typically SQL for most users).
4: Customise Export Options
- Select specific tables or leave all tables selected for a full database export.
- Choose options like compression and character set as needed.
5: Perform Export
- Click on the ‘Go’ button.
- Your browser will download the export file to your computer.
In-Depth Guide
Each step in the export process provides several options and settings. Understanding these helps you tailor the export to your specific needs. This in-depth guide equips you with the knowledge to export data effectively, whether for backups, migrations, or data analysis.
Selecting your mySQL Database for export
In phpMyAdmin, locate your desired MySQL database in the sidebar. Click on the database name to review its structure, preparing it for data export. Each database in PHPMyAdmin is listed with its name. If you have multiple databases, you may wish to verify the database’s contents by browsing its tables before exporting.
Export Methods and Formats
PHPMyAdmin offers two primary export methods: ‘Quick’ and ‘Custom’.
The ‘Quick’ method, as described in the Quick Start guide above, exports the entire database with default settings, which is suitable for general backups. The ‘Custom’ method allows for more granular control, like selecting specific tables or altering output format and compression.
| Export Type | Description | Use Cases |
|---|---|---|
| Quick Export | Exports the entire database with default settings, suitable for general backups. | – Creating a backup of your database. – Sharing your database with others. – Transferring data to a new server or platform. |
| Custom Export | Allows for more granular control over the export process, including selecting specific tables, altering output format and compression, and configuring additional options. | – Exporting a subset of data from your database. |
Choosing the Export Format of your SmartHost data using phpMyAdmin Export
SQL is the most common export type and is recommended for MySQL database backups. However, formats like CSV, CSV for Excel, XML, etc can be used for migrations to non-MySQL systems.
The table below provides a comprehensive overview of the various export format types available in PHPMyAdmin, along with brief descriptions of their functionalities. From generating code to exporting data for specific applications, each format caters to specific needs and requirements.
| Format | Description |
|---|---|
| CodeGen | Generates code from the exported data. |
| CSV | Comma-separated values format, used to export data to other systems requiring basic text. |
| CSV for MS Excel | Comma-separated values format that is optimised for importing into Microsoft Excel. |
| JSON | JavaScript Object Notation format, used to store structured data in a human-readable and easy-to-parse format. |
| LaTeX | Mathematical typesetting system, used to create professional-looking documents that contain mathematical equations. |
| MediaWiki Table | Table format that can be imported into MediaWiki, a free and open-source wiki software. |
| Microsoft Word 2000 | Rich Text Format (RTF) format, used to export data to Microsoft Word 2000 and other word processors. |
| OpenDocument Spreadsheet | OpenDocument format, used to export data to OpenOffice or LibreOffice, which are free and open-source office productivity suites. |
| OpenDocument Text | OpenDocument format, used to export data to OpenOffice or LibreOffice, which are free and open-source office productivity suites. |
| PDF (Portable Document Format) is used to create documents that can be viewed and printed without requiring any specific software. | |
| PHP array | PHP array format, used to export data into PHP code. |
| SQL | Structured Query Language format, used to export data in the form of SQL statements. |
| Texy! text | Texy! format is a lightweight markup language that is similar to LaTeX. |
| XML | Extensible Markup Language format, used to store structured data in a platform-independent and self-describing format. |
| YAML | YAML Ain’t Markup Language format, a human-readable data serialization language that is easy to read and write. |
Selecting Tables to Export
The Tables section on the custom export screen in PHPMyAdmin allows you to select the specific tables you want to export from your database. This is useful when you only need to export a subset of your data, or when you want to exclude certain tables from the export.
To select the tables you want to export, simply check the boxes next to the names of the tables you want to include. If you want to export all of the tables in your database, you can click the “Select All” button.
Once you have selected the tables you want to export, you can customise the export options, or click the “Go” button to start the export process. The export file will be downloaded to your default downloads folder.
Customising Export Options
This table summarises the Format-specific options available when exporting data using PHPMyAdmin, providing clear descriptions and visual aids for each option.
| Format Option | Option | Description |
|---|---|---|
| SQL | Add DROP TABLE | Includes commands to drop existing tables before creating them, useful for clean reinstalls. |
| Add AUTO_INCREMENT value | Ensures auto-increment values are included in the export. | |
| Enclose export in a transaction | Useful for maintaining database integrity. | |
| CSV | Column delimiter | Select the character that separates columns in the CSV file. |
| Text encapsulation | Select how strings in the CSV file should be enclosed. | |
| Escape character | Select the character that should be used to escape special characters in the CSV file. | |
| Select fields | Select the specific fields to export. | |
| Create a header row | Include a header row with the names of the fields in the CSV file. | |
| Use NULL instead of empty strings | For columns that are typically empty, use NULL instead of empty strings in the CSV file. | |
| Add BOM (byte order mark) | Add a byte order mark (BOM) to the CSV file, which can be useful for compatibility with certain applications. | |
| Other | Compression | Select whether to compress the export file using gzip or bzip2. |
| Character set | Select the character set that should be used for the export file. | |
| Output format | Select the format for the output file, such as HTML, XML, or PDF. | |
| Filename | Specify the name of the export file. | |
| Save options | Save the chosen options for future use. |
Export MySQL data
After carefully selecting your preferences for the export, including the desired format, compression, and specific tables, click the “Go” button to initiate the data export process.
The export commences, and the generated file is typically downloaded from the SmartHost database server to your default downloads folder. Monitor the progress of the download to ensure its successful completion. Once the file is downloaded, it’s crucial to safeguard it securely, as it contains sensitive database information.
Consider storing the exported file in multiple locations, such as an external hard drive or cloud storage for added protection. Regular backups of your database are essential for data integrity, disaster recovery, and migration purposes.
Conclusion
Understanding the process of exporting MySQL data via phpMyAdmin in cPanel enables efficient database management, whether for backups, migrations, or analysis. Regularly performing data exports ensures data integrity and facilitates smooth transitions between systems.
