Quick Start Guide
Overview
The Managed DNS function within the SmartHost Client Area allows users to effortlessly create and manage the DNS zones for domains not hosted by SmartHost. Accessible through the customer portal, this feature provides flexibility in managing domain DNS settings, ensuring your domains point to the correct IP address even if they are hosted externally. SmartHost simplifies the DNS management process, making it accessible to users of all technical levels.
Steps to Manage DNS
- Login to Your Account: Access the SmartHost customer portal at https://portal.smarthost.ie and log in.
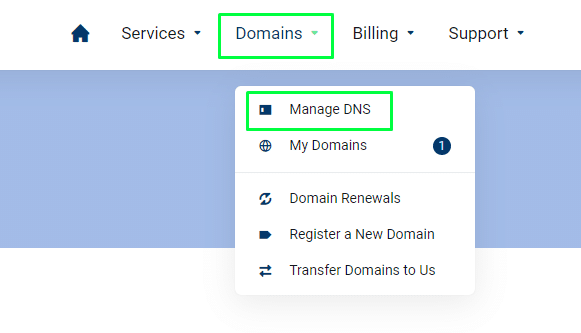
- Navigate to Managed DNS: Select ‘Domains’ from the top menu, then click on ‘Manage DNS’.
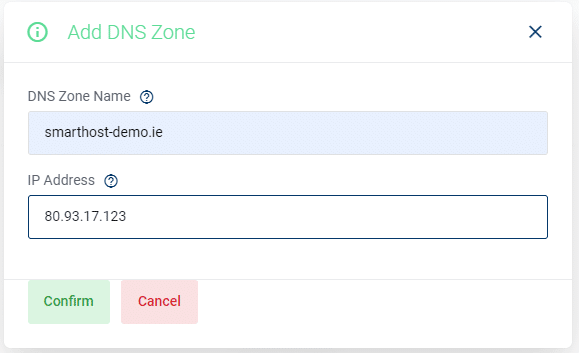
- Add a DNS Zone: Click the “Add DNS Zone” button. Enter the domain name and the IP address you wish the domain to point to. This action creates a DNS zone file with an “A” record for your domain.
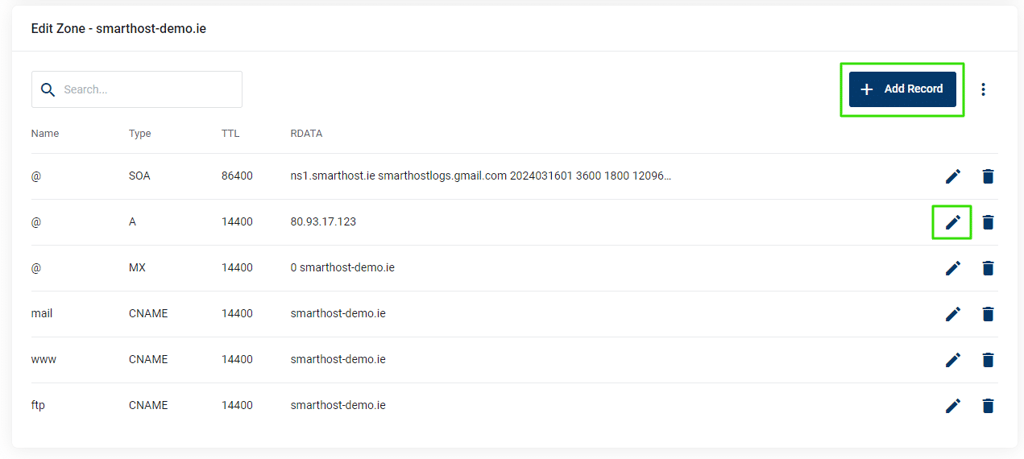
- Edit DNS Zone: To modify the DNS zone records, click the pencil icon next to the relevant domain.

- Add or Edit Zone Records: Adjust individual zone records as needed, including the addition of new records.
In-depth Guide
Introduction to Managed DNS
SmartHost’s Managed DNS function empowers users with the ability to manage DNS zones for domains that are hosted outside of SmartHost. This feature is useful for customers who require direct control over their domain’s DNS settings, providing a streamlined interface for editing and updating DNS records.
Understanding DNS Records
DNS records are essential components that guide internet traffic to your domain. Here’s a breakdown of common DNS record types available within the SmartHost Client Area:
| Record Type | Description |
|---|---|
| A | Points a domain to an IPv4 address. |
| AAAA | Directs a domain to an IPv6 address. |
| CNAME | Maps a domain to another domain name, instead of an IP address. |
| MX | Specifies mail exchange servers for a domain. |
| PTR | Maps an IP address to a domain name, reverse of an A record. |
| SOA | Contains administrative information about a domain, such as the primary name server and email of the domain administrator. |
| TXT | Allows administrators to insert arbitrary text into a DNS record, often used for email verification. |
TTL Explained
TTL, or Time To Live, is a setting for each DNS record that dictates how long a DNS cache should keep the record before requesting a new copy from the authoritative DNS server. The default TTL in SmartHost’s Managed DNS is 14400 seconds (4 hours), balancing the need for timely updates with reducing unnecessary DNS queries.
Deleting a DNS Zone File
Deleting a DNS zone file removes all the DNS settings associated with a specific domain, ceasing its DNS management through the SmartHost Client Area. Users must comprehend the implications of deleting a DNS zone file, as it affects how the domain is resolved on the internet.
Steps to Delete a DNS Zone File
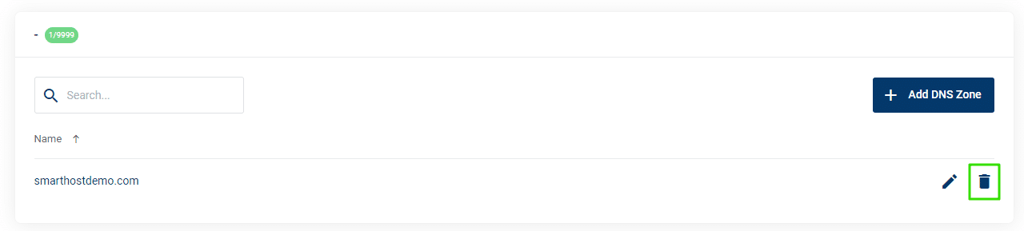
- Navigate to the DNS Zone List: After logging into the SmartHost Client Area, proceed to the ‘Manage DNS’ section under ‘Domains’ to view the list of your DNS zones.
- Identify the Domain: Locate the domain whose DNS zone file you wish to delete.
- Click the Bin Icon: Next to the domain, you will see a bin icon. Clicking this icon initiates the process to delete the DNS zone file for that specific domain.
- Confirm Deletion: You may be prompted to confirm your action. Understand that proceeding will permanently remove the DNS zone file and all its associated records. Confirm the deletion if you are sure you wish to proceed.
Before deleting a DNS zone file, ensure you have backed up any necessary DNS records or are prepared to manage these records through another service. Deletion is irreversible through the SmartHost Client Area and will result in the domain being unresolved.
Deleting a DNS zone file is a straightforward process but carries significant implications for your domain’s accessibility on the internet. If you have any doubts or require further assistance, SmartHost’s support team is available to guide you through the process and discuss any concerns you may have about managing your domain’s DNS settings.
Name Server Information
For the Managed DNS system provided by SmartHost to function effectively, it is important that domains utilise SmartHost’s designated name servers. This step ensures that all DNS management activities performed within the SmartHost Client Area are accurately reflected and propagated across the internet.
Configuring Your Domain with SmartHost Name Servers
Name Servers to Use:
ns1.smarthost.iens2.smarthost.ie
Steps to Configure Name Servers:
- Domain Registrar Access: Log into the account where your domain is currently registered.
- Name Server Settings: Navigate to the domain management section and locate the settings for name servers.
- Update Name Servers: Replace any existing name servers with SmartHost’s name servers:
- For the primary name server, enter
ns1.smarthost.ie. - For the secondary name server, enter
ns2.smarthost.ie.
- For the primary name server, enter
- Save Changes: Ensure you save or confirm the changes to update your domain’s name server settings.
FAQ about Managed DNS
Yes, SmartHost’s Managed DNS function allows you to manage DNS settings for domains hosted externally or domains that you have registered with SmartHost, but are hosting elsewhere.
A DNS zone is a part of the DNS namespace delegated to be managed by a specific organization or administrator. It contains DNS records for a domain.
After creating a DNS zone, click the pencil icon to edit, then add or edit DNS records as required for your domain.
Yes, while the default TTL is set to 14400, you can adjust the TTL value for individual DNS records based on your requirements.
