Introduction
The DNS Zone Editor in cPanel empowers you to manage the DNS records for your domains, effectively configuring your websites and email servers for seamless global accessibility. DNS records act as the Internet’s address book, translating human-friendly domain names into computer-understandable IP addresses. This translation enables users to type in a domain name like “www.smarthostdemo.ie” and reach your website, regardless of where you host it.
With the DNS Zone Manager, you can easily add, edit, or delete DNS records, ensuring your domain’s information is up-to-date and accurate. This can be crucial for setting up new websites, forwarding emails to different addresses, or creating subdomains. Whether you’re a seasoned webmaster or just starting, the DNS Zone Manager is an essential tool for managing your domain’s DNS records and keeping your online presence in top shape.
Before you Begin
Viewing DNS Records
cPanel provides a direct view of your domain’s DNS Zone file, which holds all your DNS records and is stored on the SmartHost DNS servers.
- Log in to your SmartHost cPanel Account: Ensure you’re logged into cPanel using the cPanel account associated with the domain for which you want to manage DNS records.
- Locate the Domains Section: Navigate to the “Domains” section within cPanel and click on the “Zone Editor” icon.
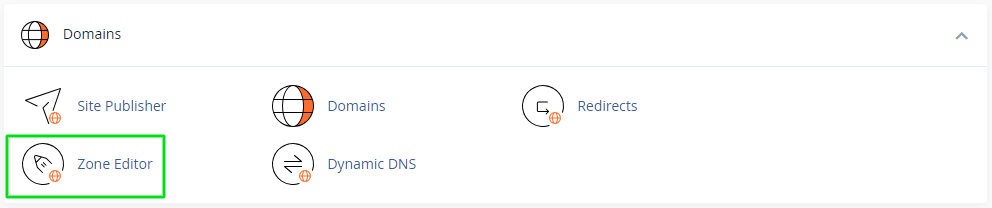
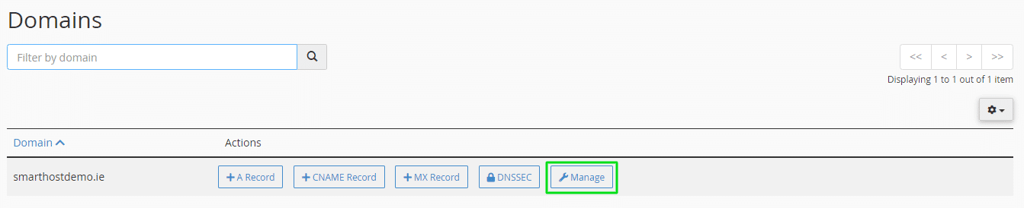
- Locate your domain in the list displayed under the Domain heading. Next, under the Actions heading, click on the Manage link associated with the domain you want to manage DNS records for.
Browsing Records by Type
The DNS Zone Editor in cPanel can display up to 100 DNS records per page. To simplify navigation, you can filter the displayed records based on their type.
Filtering Records
On the Manage Zone page, click on the “Filter:” drop-down list and select the desired record type. Each page will only display the records for the selected record type. This allows you to focus on a specific group of records without being overwhelmed by the entire list.
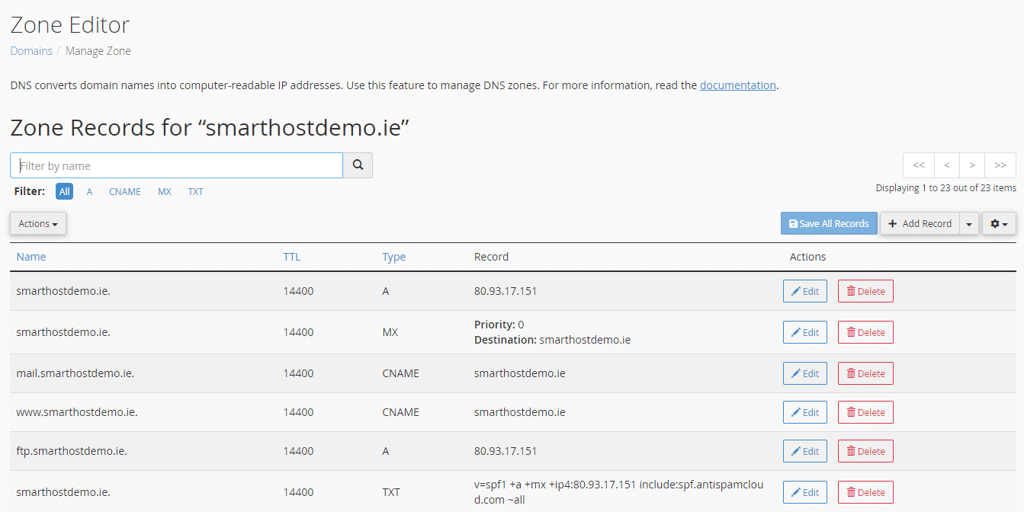
By filtering records by type, you can effortlessly manage particular categories of records, such as A records, CNAME records, or MX records, enhancing your overall DNS management experience.
Adding Zone Records
The DNS Zone Editor allows you to add new records to your domain’s DNS zone file. This allows you to configure various aspects of your domain’s online presence, such as setting up websites, forwarding emails, or creating subdomains.
Click on the “Add Record” button.
- In the “Record Type” dropdown list, select the type of record you want to add. Common types include A, CNAME, MX, and TXT records.
- In the “Host” field, enter the name of the record. For example, for an A record for the domain smarthostdemo.ie, you would enter “www” or “smarthostdemo.ie”.
- Fill in the remaining fields specific to the chosen record type. For instance, for an A record, enter the IPv4 address of the website server.
- Click on the “Create Record” button to create the new record.

Editing Zone Records
To modify an existing record, follow these steps:
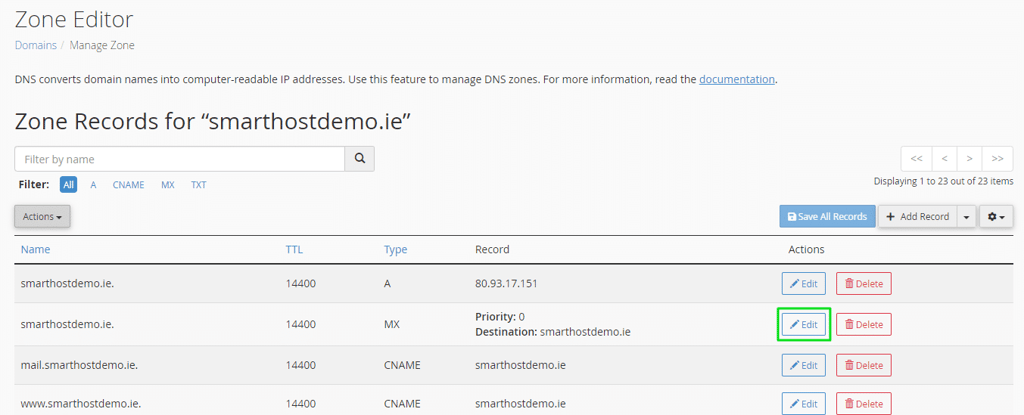
- Locate the record in the list of records and click on the “Edit” button next to it.
- Make the desired changes to the record’s details, such as the record type, hostname, IP address, or TTL (time to live).
- Click on the “Save” button to apply the changes to the record.
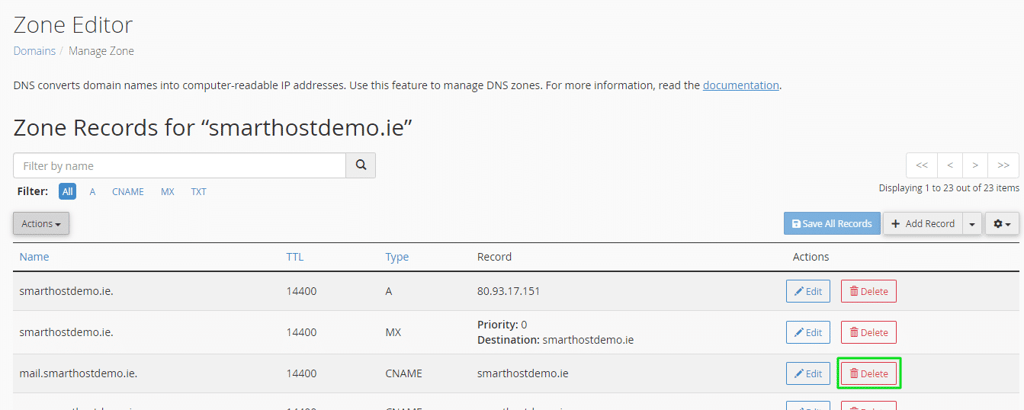
Deleting Zone Records
To remove an existing record, follow these steps:
- Locate the record in the list of records and click on the “Delete” button next to it.
- A confirmation prompt will appear. Click on the “Yes, Delete” button to permanently remove the record.
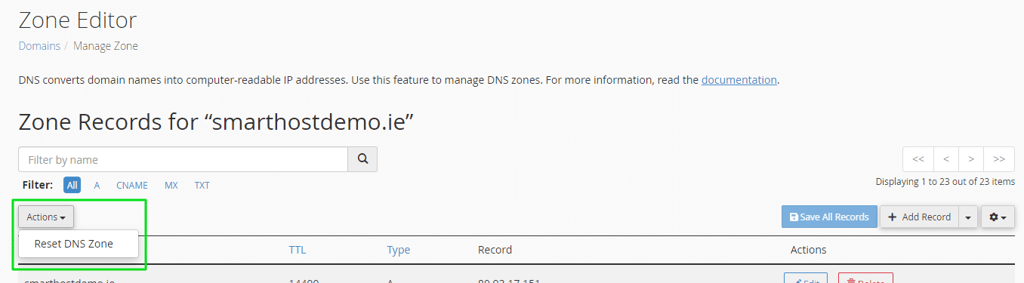
Resetting Your DNS Zone
When you add a domain to cPanel, it automatically generates a standard set of DNS records. If you’ve made any modifications or deletions to these records and want to restore them to the default state, you can reset your DNS zone. This will erase all custom records you’ve created and replace them with the original setup. Follow these steps to reset your DNS zone:
- Select the Domain: Find the domain for which you want to reset the DNS zone in the list.
- Reset DNS Zone: Under the “Actions” heading, click on the “Manage” link corresponding to the selected domain.
- Initiate Reset: Click on the “Action” drop-down menu located above the left corner of the table.
- Select Reset Option: From the drop-down menu, choose the “Reset Zone” option.
- Confirm Reset: A warning message will appear stating that resetting the zone will erase all custom records. Click on the “Continue” button to proceed.
- Reset Completed: The DNS zone will be reset, restoring it to its original configuration.
Further Reading
DNS: The Invisible Power Behind Web Browsing
When you type a domain name like “smarthostdemo.ie” into your web browser, it doesn’t instantly connect you to the website. Instead, it initiates a process called DNS resolution, which translates human-readable domain names into machine-understandable IP addresses. This invisible power behind web browsing is handled by a vast network of DNS servers that work together to ensure seamless navigation.
How DNS Works
To understand how DNS works, think of it as a directory of addresses. When you type a domain name, your web browser sends a query to a DNS resolver, which acts as a directory lookup service. The resolver then contacts other DNS servers, following a chain of referrals, until it finds the corresponding IP address for the domain name.
The Importance of DNS
DNS plays a crucial role in the functioning of the internet, enabling users to access websites and email servers without memorizing complex IP addresses. It’s a decentralised system that ensures redundancy and reliability, making it an essential part of the modern Internet infrastructure.
Remember, the Zone Editor in cPanel is a potent tool. Incorrect modifications can disrupt your website’s accessibility and email functionality. If unsure, consult a professional or contact Smarthost’s support team for assistance.
Comprehensive description of the main DNS record types
A Record
An A record maps a domain name to an IPv4 address. It’s the most common type of DNS record for websites, as it specifies the IP address of the web server hosting the website. For example, the A record for the domain “www.smarthostdemo.ie” would point to the IP address of the web server hosting the “www” subdomain.
AAAA Record
An AAAA record maps a domain name to an IPv6 address. IPv6 is the newer version of the Internet Protocol, and it’s becoming increasingly important as the number of devices connected to the Internet grows. AAAA records are typically used for websites that need to support IPv6 traffic.
TXT Record
A TXT record contains arbitrary text data that can be associated with a domain name. It’s often used for purposes such as SPF (Sender Policy Framework) records, which tell email servers which mail servers are authorized to send emails from a domain. TXT records can also be used for various other purposes, such as storing website analytics data or identifying the domain owner.
CNAME Record
A CNAME record creates an alias for a domain name. This means that when a user types the CNAME record’s hostname into their browser, they will be directed to the original hostname. CNAME records are often used for creating subdomains, such as “www” or “blog”.
MX Record
An MX record specifies the mail servers responsible for handling email for a domain. Each MX record assigns a priority value, dictating the sequencing of mail servers when attempting to deliver emails to the domain. For example, the MX record for the domain “smarthostdemo.ie” might have two MX records, one with a priority of 10 and the other with a priority of 20. The first mail server with the highest priority value will be the initial recipient of email deliveries. If that fails, the next mail server with the next highest priority value will be contacted.
SRV Record
An SRV record specifies the service location for a domain. It’s used for various purposes, such as locating VoIP (Voice over IP) servers or configuring conferencing services. SRV records contain three components: a protocol name, a port number, and a list of hostnames and priorities.
PTR Record
A PTR record maps an IP address to a hostname. It’s typically used for reverse DNS lookups, which can be used to identify the owner of an IP address. For example, if an IP address has a PTR record for “smarthostdemo.ie”, then it means that the IP address is owned by the domain “smarthostdemo.ie”.
By understanding the different types of DNS records, you can effectively manage your domain’s online presence and ensure that your website and email are accessible to users worldwide.
Additional Resources
For further detailed information, refer to the official cPanel DNS Zone Manager documentation: https://docs.cpanel.net/whm/dns-functions/dns-zone-manager/
Frequently Asked Questions
How do I use the zone editor in cPanel?
Access the cPanel account linked to your domain. Navigate to the “Domains” section and click on the “Zone Editor” icon. Here, you can view, add, edit, or delete DNS records.
How do DNS zones work?
DNS zones are sections of the domain name system that manage the DNS settings for a domain. They contain records that translate domain names into IP addresses, facilitating internet navigation.
How do I manage DNS in cPanel?
Log into cPanel, go to the “Domains” section, and select “Zone Editor.” From there, you can view, filter, add, edit, or delete DNS records for your domain.
What is the DNS zone contents?
DNS zone contents include various types of records, such as A, AAAA, TXT, CNAME, MX, and SRV records, which collectively manage how a domain interacts with the internet.
What is DNS zone editor?
The DNS Zone Editor in cPanel is a tool that allows users to manage the DNS records of their domains, crucial for configuring websites and email servers.
